Battery switch on travel trailer function is crucial for managing your RV’s power. Understanding how these switches work – whether single, dual, or rotary – is key to safe and efficient energy use. This guide breaks down everything you need to know, from locating your switch to troubleshooting common problems. Get ready to become a power management pro!
We’ll cover different switch types, their placement (and why it matters!), safe operation procedures, and even how to tackle common issues. Think of this as your ultimate guide to mastering your travel trailer’s electrical system. Let’s dive in!
Battery Switch Types in Travel Trailers
Choosing the right battery switch for your travel trailer is crucial for managing your power sources efficiently and safely. Different types offer varying levels of control and complexity, each with its own set of pros and cons. Understanding these differences will help you select the best option for your needs.
Single Battery Switch Operation, Battery switch on travel trailer function
A single battery switch is the simplest type, designed for use with a single battery. It’s essentially an on/off switch that connects or disconnects the battery from the trailer’s electrical system. Internally, it’s a basic switch mechanism, often a simple toggle or rocker switch, that breaks or makes the circuit. The advantage is its simplicity and low cost.
However, it lacks the flexibility of managing multiple batteries or isolating different circuits.
Dual Battery Switch Operation
Dual battery switches allow you to manage two batteries independently. Common types include rotary switches and selector switches. Rotary switches typically offer three positions: “Both,” “Battery 1,” and “Battery 2,” allowing you to use both batteries simultaneously, only one battery, or to disconnect both completely. Internally, these switches use a rotating selector to connect the appropriate battery or combination of batteries to the circuit.
So, you’re an audiophile who travels? Awesome! Check out this guide on building the perfect audiophile travel setup to ensure your ears are happy on the go. Don’t forget to sort out your insurance before you leave! Getting Aon travel insurance is a smart move, protecting your expensive gear and ensuring a smooth trip.
Planning ahead means less stress and more enjoyment – so get those details sorted before you pack your bags!
Selector switches often use a lever to select between different battery combinations. Dual battery switches provide more control and flexibility than single switches, allowing for better management of battery power and extending the lifespan of your batteries. However, they are slightly more complex and costly than single switches.
Rotary Battery Switch Operation
Rotary switches, often used in dual battery setups, offer multiple positions to control the flow of power from different batteries. The internal mechanism is a rotating contact that connects different terminals based on the switch’s position. These switches are durable and relatively easy to use. They provide good control and flexibility but can be slightly more expensive than simpler toggle switches.
A common disadvantage is the potential for confusing the different switch positions, particularly for those unfamiliar with the setup.
Comparison of Battery Switch Types
| Feature | Single Battery Switch | Dual Battery Switch | Rotary Battery Switch (Dual or More) |
|---|---|---|---|
| Number of Batteries Managed | One | Two | Two or more |
| Internal Mechanism | Simple toggle or rocker switch | Rotary selector or lever switch | Rotating contact selector |
| Cost | Low | Medium | Medium to High |
| Complexity | Low | Medium | Medium to High |
| Flexibility | Low | Medium | High |
Operating the Battery Switch
Properly operating your travel trailer’s battery switch is crucial for maintaining your batteries’ health and preventing electrical issues. Understanding how to safely switch power on and off, and how to isolate battery banks if your setup allows for it, is essential for every RVer. This section details the safe and efficient operation of your battery switch.
Turning the battery switch on and off involves a simple process, but safety precautions are paramount. Always ensure the switch is in the correct position before performing any electrical work on your trailer. Incorrectly manipulating the switch can lead to short circuits or damage to your electrical system. Understanding your specific battery switch type (as detailed in the previous section) will inform the exact procedure for your rig.
Battery Switch On/Off Procedure
The steps for turning your battery switch on and off will vary slightly depending on the type of switch you have. However, the general principles remain consistent: safety first! Always double-check the switch position before undertaking any electrical tasks.
- Locate the Battery Switch: This is typically found near the battery compartment, inside a storage compartment, or even within a dedicated electrical panel.
- Verify Switch Position: Before making any changes, confirm the current position of the switch. This helps prevent accidental actions.
- Turn the Switch ON: To turn the switch on, rotate it to the ‘ON’ position (often indicated by an ‘I’ symbol or a similar graphic).
- Turn the Switch OFF: To turn the switch off, rotate it to the ‘OFF’ position (often indicated by a ‘0’ symbol or similar).
- Confirm Operation: After turning the switch on or off, verify its operation by checking the functionality of appliances or devices powered by the battery system. If using a multimeter, you can test the voltage at the battery terminals.
Isolating Battery Banks
Some travel trailers have multiple battery banks (e.g., one for house power, one for starting the vehicle). In these setups, the battery switch might allow for isolating individual banks. This feature is beneficial for preventing battery drain in one bank from affecting the other.
The exact procedure for isolating banks will depend on the switch’s design. Some switches may have multiple positions or switches, allowing you to selectively disconnect specific banks. Your owner’s manual should clearly detail how to isolate your battery banks if this is a feature of your system. Incorrect operation can lead to unintended consequences, so refer to the manual for your specific setup.
Preventing Accidental Switch Operation
Accidental switch operation can drain your batteries or cause other electrical issues. Here are some best practices to avoid this:
- Label Clearly: Ensure the switch is clearly labeled “BATTERY SWITCH” or with similar wording.
- Secure Mounting: Mount the switch securely to prevent accidental bumping or movement.
- Use a Cover: Consider using a protective cover over the switch when not in use, especially if it’s located in an area prone to accidental contact.
- Train Family Members: Teach all users of the travel trailer how to properly and safely operate the battery switch.
Battery Switch and Electrical System Integration
The battery switch is the central control point for your travel trailer’s 12-volt DC system. Understanding its interaction with other electrical components is crucial for safe and reliable operation. A properly functioning battery switch ensures efficient power distribution and prevents potential damage to your appliances and batteries.The battery switch acts as a master on/off switch, controlling the flow of power from your trailer batteries to the rest of the 12V DC system.
So, you’re an audiophile who travels? Awesome! Check out this guide on building the perfect audiophile travel setup to keep your ears happy on the go. It’s all about packing light but smart. Then, before you jet off, remember to sort out your travel insurance; getting Aon travel insurance is a good idea to protect your gear and yourself, just in case anything goes wrong.
Peace of mind is essential for a truly relaxing trip!
This includes everything from interior lights and water pumps to your refrigerator and other 12V appliances. It prevents accidental drain on your batteries when the trailer is not in use, and it also isolates the batteries from the system for maintenance or repairs. The switch is typically a simple, robust device, but its role is fundamental to the entire electrical setup.
Power Distribution Management
The battery switch manages power distribution by either connecting or disconnecting the batteries from the load center or fuse panel. When the switch is “on,” power flows freely from the batteries, through the switch, and to the various circuits protected by fuses and circuit breakers in the load center. When the switch is “off,” the circuit is broken, preventing any power from reaching the appliances.
This simple action prevents battery drain when the trailer is stored, and protects against short circuits and electrical fires.
Implications of a Faulty Battery Switch
A malfunctioning battery switch can have several negative consequences. A switch that fails in the “on” position can lead to continuous battery drain, potentially leaving you with a dead battery when you need it most. Conversely, a switch that fails in the “off” position renders your 12V system inoperable, preventing the use of essential appliances. In more severe cases, a faulty switch could overheat, creating a fire hazard.
Regular inspection and maintenance are essential to prevent these issues.
Wiring a Battery Switch
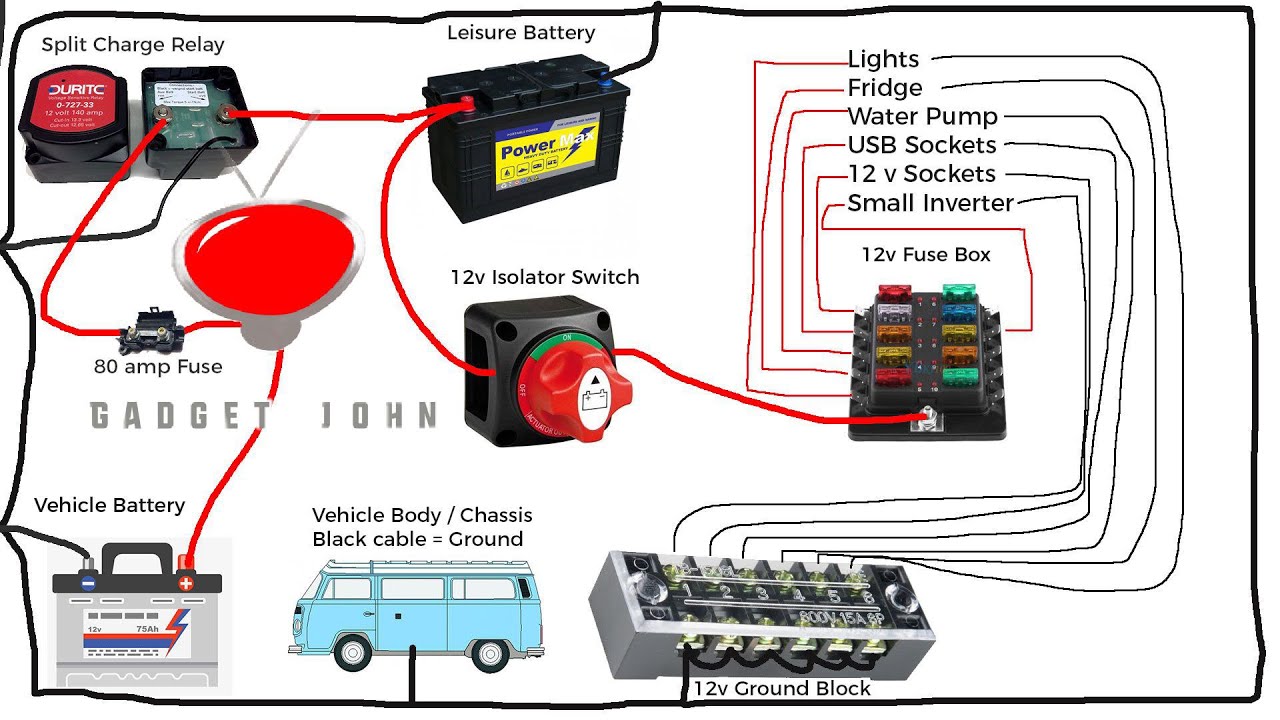
Correctly wiring a battery switch is vital for safety and proper operation. The following diagram illustrates a typical setup. Remember to always disconnect the battery negative terminal before working on any electrical components.
                      +-----------------+
                      |    Battery (+)   |
                      +--------+---------+
                              |
                              |
                              V
                      +--------+---------+
                      | Battery Switch  |  ---> Fuse/Circuit Breaker ---> Load Center ---> Appliances
                      +--------+---------+
                              |
                              |
                      +--------+---------+
                      |    Battery (-)   |
                      +-----------------+
This diagram shows the positive (+) battery cable connected to the input of the battery switch.
The output of the switch then connects to a fuse or circuit breaker for protection, followed by the main load center or fuse panel which distributes power to the various appliances. The negative (-) battery cable should be directly connected to the chassis ground of the trailer. Always use appropriately sized wiring and fuses/circuit breakers for the current draw of your appliances.
Incorrect wiring can lead to overheating, fire hazards, and damage to your electrical system.
Safety Precautions When Using a Battery Switch
Working with your travel trailer’s battery system, including the battery switch, requires caution. Improper handling can lead to serious consequences, including electric shock, burns, and even fire. Always prioritize safety when performing any tasks related to your RV’s electrical system.
- Disconnect Before Working: Before performing any maintenance or repairs on your travel trailer’s electrical system, always disconnect the battery switch. This cuts off power to the entire system, preventing accidental shocks or short circuits.
- Wear Appropriate Safety Gear: Always wear safety glasses to protect your eyes from sparks or flying debris. Consider wearing insulated gloves to protect your hands from electrical shock. Closed-toe shoes are also recommended to prevent injury from dropped tools or other hazards.
- Use Insulated Tools: When working near batteries or electrical connections, use insulated tools to prevent accidental shocks. Avoid using metal tools unless they are specifically designed for electrical work and are properly insulated.
- Proper Ventilation: Batteries produce hydrogen gas, which is highly flammable and explosive. Ensure adequate ventilation in the area where you are working with the battery switch to prevent the buildup of this gas. Never work near an open flame or sparks while near the batteries.
- Know Your System: Before working with the battery switch, familiarize yourself with your travel trailer’s specific electrical system. Understand the location of all components and how they interact. This will help you to safely disconnect and reconnect the battery switch without causing damage or injury.
- Avoid Contact with Battery Terminals: Never touch the battery terminals while the battery switch is connected. Even if the switch appears to be off, there might be residual voltage. Always ensure the switch is fully off and wait a few minutes before touching the terminals.
- Secure Connections: When reconnecting the battery switch, ensure all connections are tight and secure. Loose connections can create sparks and lead to overheating or fire. Use the correct size and type of connectors for your battery and wiring.
- Seek Professional Help When Needed: If you are unsure about any aspect of working with your battery switch or electrical system, do not hesitate to seek professional help from a qualified RV technician. Improper handling can cause significant damage and create safety hazards.
Safe Disconnection and Reconnection Procedures
Turning the battery switch off and on is a seemingly simple task, but improper execution can lead to sparks, potential damage to the electrical system, or even injury. Always follow these steps for safe and reliable operation. First, ensure you have identified the correct switch and understand its function within your RV’s electrical setup. Then, slowly and firmly turn the switch to the “off” position.
Observe the switch mechanism; any unusual sounds or resistance may indicate a problem requiring professional attention. When reconnecting, follow the same deliberate approach, ensuring the switch clicks firmly into the “on” position.
Mastering your travel trailer’s battery switch is about more than just turning it on and off; it’s about understanding your RV’s electrical system and ensuring safe, efficient power management. By understanding the different switch types, their placement, and troubleshooting techniques, you’ll be prepared for any situation. Happy travels!
General Inquiries: Battery Switch On Travel Trailer Function
What happens if my battery switch is corroded?
Corrosion can prevent proper connection and lead to poor power delivery or even a fire hazard. Clean the terminals with a wire brush and baking soda solution, then apply dielectric grease.
How often should I check my battery switch?
At least once a year, or more frequently if you notice any issues. Inspect for corrosion, loose connections, and damage.
Can I use a different type of battery switch in my trailer?
Possibly, but it’s crucial to ensure compatibility with your existing electrical system. Consult a qualified electrician to avoid damaging your RV.
My battery switch is stuck. What should I do?
Try using a penetrating lubricant like WD-40. If it’s still stuck, it might need replacement. Don’t force it, as you could cause further damage.
